03.09.2026
227
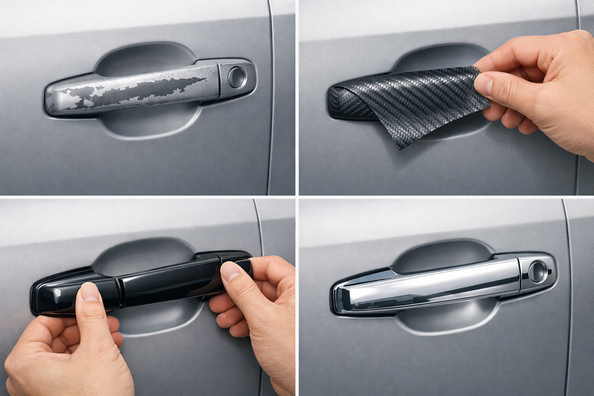

If a door handle is already worn, painting isn’t the only way out. First you need to understand where the defect is: in the recess behind the handle, on the handle itself, or if it’s just scratches in the clear coat. That determines what will work: light polishing, clear protective film, a cover over the factory handle, or a full replacement of the part.
The most common mistake is simple: trying to cover different types of wear with one method. Clear film is great at preventing new scratches and can slightly soften minor scuffs, but it won’t hide a surface that’s been rubbed through. A cover, on the other hand, can genuinely conceal a worn handle, while vinyl wrap on complex shapes often holds up worse than people expect.
The door handle and the area under it are constantly in contact with fingernails, rings, keys, bags, and car-wash brushes. That’s why small marks appear first, then dulling, and later obvious wear of the top layer.
The issue is also that different parts of the assembly wear differently. The recess behind the handle gets scratched more often but usually keeps its shape. The handle itself may not only get scratched, but also wear through the decorative layer—especially if it’s a painted or chrome piece that’s grabbed frequently.
DD Tuning expert comment: The most common mistake is this: people apply clear film to an already worn-through handle and expect the defect to disappear. The second typical mistake is choosing a universal cover without checking the clearance near the button or sensor. Before choosing, it’s better to evaluate the recess behind the handle and the handle itself separately: they usually require different solutions.
| Symptom | Likely cause | What to do |
|---|---|---|
| Light spiderwebbing and haze, fingernail doesn’t catch | Scratches only in the top clear-coat layer | Try gentle polishing, then cover the area with clear film |
| Scratches in the recess behind the handle, the handle itself is intact | Constant contact with nails, keys, jewelry | Apply clear urethane film to the recess; it better prevents repeat wear |
| The outer surface of the handle is worn through | Worn coating from frequent grabbing | Consider a cover over the factory handle or replacing the handle |
| Deep scratch that catches a fingernail | Damage deeper than the clear coat | Don’t count on polishing; either mask it with a cover or replace the part |
| Edges of old wrap have lifted, dirt is visible along the outline | Complex handle shape, weak installation, or worn material | Remove the old covering, clean the surface, and switch to a different solution |
If the defect is superficial and still within the clear coat, it’s best to start with light polishing. It won’t restore lost material, but it can remove haze and make minor marks less noticeable. After that, it makes sense to protect the area right away—otherwise the scratches will quickly return.
For the recess behind the handle, clear urethane film works best in practice. It barely changes the appearance, is often around 0.3 mm thick, and can take the brunt of new scratches; small marks on it may become less noticeable over time from heat. Apply it to a clean, degreased surface at temperatures no lower than 15 °C; if it’s cold, warm the part and the material to 25–50 °C and press from the center outward.
If it’s the handle itself that’s worn, not the area behind it, a vehicle-specific cover over the factory piece typically works better. It instantly hides the worn surface and doesn’t require painting. The cleanest look comes from solutions made for a specific car, because universal options more often leave a visible edge or gap.
Vinyl wrap on door handles isn’t a failure in every case, but it’s not a universal fix either. A handle has constant grip contact, complex curves, and loaded edges, so vinyl tends to lift here more often—especially after installation in the cold, without proper heating, or on a not-perfectly-clean surface.
Cheap universal covers also work poorly if they don’t fit the shape. Even a small gap makes the edge noticeable, dirt gets packed in, and after a few weeks the handle doesn’t look fresher—it looks rougher. Likewise, don’t aggressively polish deep scratches: if you can already feel the defect with a fingernail, you won’t fully hide it that way.
If the handle mechanism works fine and the issue is only cosmetic, it makes sense to look at handle covers. This is a solid option when you need to hide an already worn surface without painting and without taking the car out of service.
If the handle has play, a crack, a damaged button, or is worn so badly that a cover would only mask the problem, it’s more practical to go to door handles and replace the assembly. And when the main wear is not on the handle itself but in the grip area behind it, it’s more useful to focus on solutions with protective PPF film rather than rigid decor.
| Solution | When it works | When it’s not worth spending money |
|---|---|---|
| Light polishing | When there are only minor marks in the clear coat without deep cuts | When the scratch is deep or a different base is already visible |
| Clear urethane film | When you need to protect the recess behind the handle and slightly soften the look of minor scuffs | When you need to hide the outer part of the handle that’s already worn down to the base |
| Model-specific handle cover | When the handle itself is worn but mechanically intact | When there’s a crack, play, button issues, or poor cover fitment |
| Vinyl wrap | When the handle is simple in shape and installation is done carefully with heating | When the handle is complex, the area is heavily loaded, or you need long service life without re-tacking edges |
| Handle replacement | When the damage is deep, the coating has worn off, or there is a mechanical defect | When the issue is only minor cosmetic wear that can be solved more simply |
From a customer’s experience: someone was looking for a way to remove the worn look of a black door handle without repainting. After inspection, it turned out the handle itself was already worn through, while the recess behind it had only minor scratches. In the end, a cover was installed on the handle, and the grip area was protected with clear film—because two different defects required two different solutions.
Without painting, the best logic is: minor wear in the clear coat—polishing; marks in the recess behind the handle—clear urethane film; the handle itself worn—model-specific cover; deep wear-through or mechanical failure—replace the part. The key is not to expect a clear material to hide a deep defect, or a cover to fix a broken handle. This material is based on real selection experience, hands-on practice, and real use cases where the result depends not on a loud promise, but on accurately identifying the type of wear.
Shipping to EU
Wholesale and retail
Own warehouse
Опис продукту
Подарунки не надаються при оформленні покупки у кредит під 0,01% або при покупці частинами.